Configure DNS Server Settings
Besides creating zone, Dcpromo.exe also creates the AD DS database and initializes the directory data in that database. It also creates replication automatically. In addition, you don’t even need to add records because all Windows 2000 or later computers can register and update their own records in the dynamic DNS.
However, you still need to configure the DNS Server because everything is not configured. For example, you need to configure reverse lookup zone, record scavenging, and automatic deletion of outdated records.
Configure Scavenging for all the zones
The DNS server stores a record for a specific period of time specified in the TTL value of the record after which the record expires. The expired records need to be removed to avoid getting false positive values. The false value occurs when the host is no longer present on the network and another host is using the same IP address as the registered host. To remove these records, you need to configure the scavenging or the aging of the DNS records. To configure the scavenging, you need to:
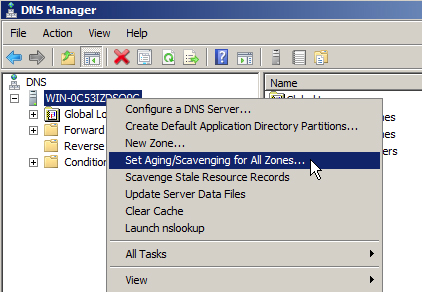
- Right-click the Server Name in DNS Manager and select SetAging/Scavenging for All Zones option from the menu that appears, as shown in Figure 2-13:

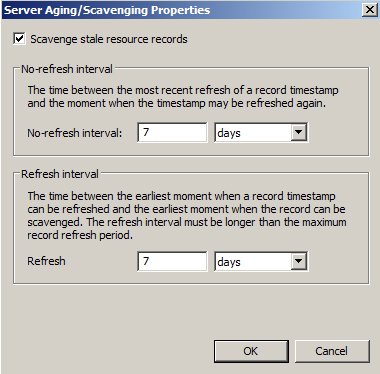
Figure 2-13 The Server Aging/Scavenging Properties page appears, as shown in Figure 2-14:
- Select Scavenge stale resource records option to enable scavenging.
- Modify the No-refresh interval and Refresh interval values if required. Usually the default values are fine.
- Click OK. The No-refresh interval ignores the attempts to dynamically refresh the time stamp of the resource record by the DNS server to prevent unnecessary refreshes from being processed by the server for expired records. This also reduces Active Directory replication traffic. The refresh interval allows the dynamic refresh of the record’s time stamp processed by the DNS server. However, ensure that the length of time is greater than the maximum possible refresh period for any resource records that are contained within the zone.

Figure 2-14 - Click OK on the Server Aging/Scavenging Confirmation dialog box that appears, as shown in Figure 2-15:

Figure 2-15
